Getting started Setup InterActor Sandbox
Wednesday, August 15, 2018 2:02 PMNote: InterActor writes to your store; backup your existing Neo4j graph database!
InterActor Sandbox runs the Community Edition of InterActor which does not allow you to connect to multiple graph stores (you need InterActor Enterprise to do that). InterActor function nodes will thus be stored as [:InterActor] nodes in the same graph store as your data. You should therefore make adequate backups of any valuable data before activating your InterActor Sandbox!Setting up the InterActor Sandbox
The InterActor Sandbox is the quickest and easiest way to experience InterActor and requires no download.
Getting up and running with InterActor Community Edition requires only two steps!
Step 1: Make sure you have an online Neo4j graph store
The InterActor Sandbox connects to an online Neo4j graph store. If you already have one, cool. If you don't, create one with providers like Neo Technology (provides datasets to experiment with!), GrapheneDB or GraphStory.
When creating an online Neo4j graph store, you will receive the url, port number and credentials that you need to activate your InterActor Sandbox.
Step 2: Sign up with InterActor and configure the InterActor Settings
Sign up with InterActor and you'll be sent an Account activation e-mail with a link. Click on this link and you'll be taken to the InterActor Settings page where you can configure the Users and the Data store.
Configuration of Users:
Set InterActor login credentials:
- confirm or adapt your InterActor Username
- choose and confirm your InterActor Password
- and Save the user.
Configuration of Data stores:
Provide credentials of the Neo4j store, as created in Step 1, to link to InterActor:
- select the Protocol
- set the Host url
- enter the Port number
- set the Username and Password for your online Neo4j database
Then click Test Connection and, when succesful, Save the store and finally Apply Settings.
InterActor will now run an initialization script on your Neo4j store and next forward you to the InterActor login page where you can login with your InterActor credentials.
That's all, happy Interacting!
A few notes
1) Limitations of the Sandbox InterActor Community Edition
The InterActor Sandbox does not impose any limitations in terms of number of nodes and relationships that you can store! It does however have a number of functional limitations:
- A single graph store, a single dashboard, a single user
- No MapView, Chartview, TimeLineView, CalendarView
- No batch triggers, conditional triggers, advanced code evaluation, path constructs
See an overview of the different versions in our Feature Matrix and read our blog or follow @Graphileon to find out what these InterActor Enterprise features can mean for you.
2) Configuration problems
If you have problems configuring and connecting the online store to InterActor then have a look at the screenshots below that show exactly how to copy the online Neo4j store settings and credentials to the InterActor Settings page. We provide examples for Neo Technology and GrapheneDB.
Note that we do not support the use of your local Neo4j installations (e.g. Neo4j Community Edition or Neo4j Desktop) with InterActor as these are usually not accessible over the internet.
Configuring an online Neo4j Sandbox for use with InterActor Sandbox
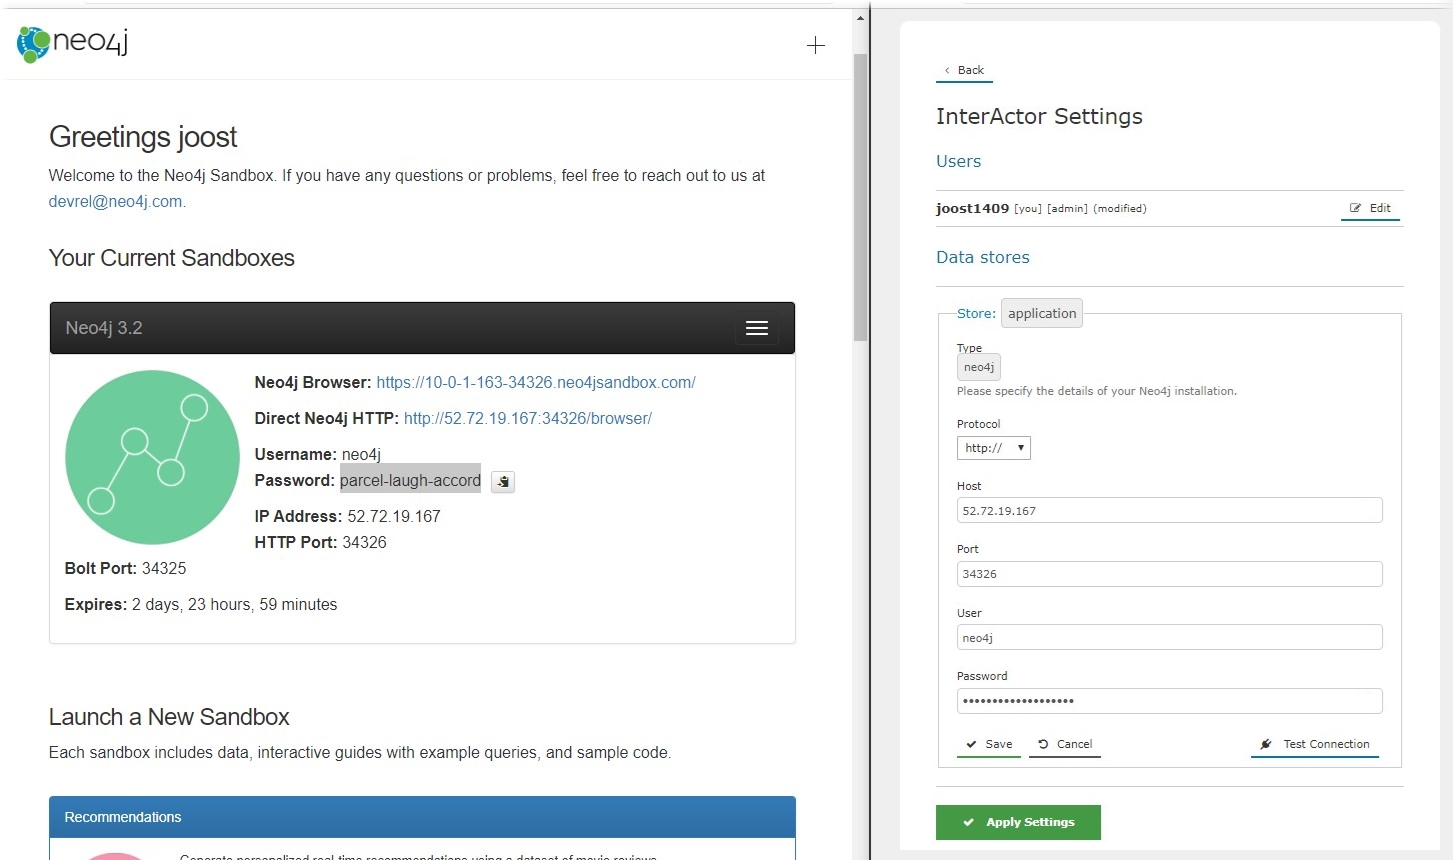
Select "http://" for 'Protocol', copy the IP Address to 'Host', set 'Port' to the port indicated under HTTP Port. 'User' is set to the Neo4j Username ("neo4j" by default) and the 'Password' copied from the Neo4j Password . Then click 'Test Connection' and if succesful, 'Save' the Data store and finally 'Apply Settings'.
Configuring an online GrapheneDB for use with InterActor Sandbox
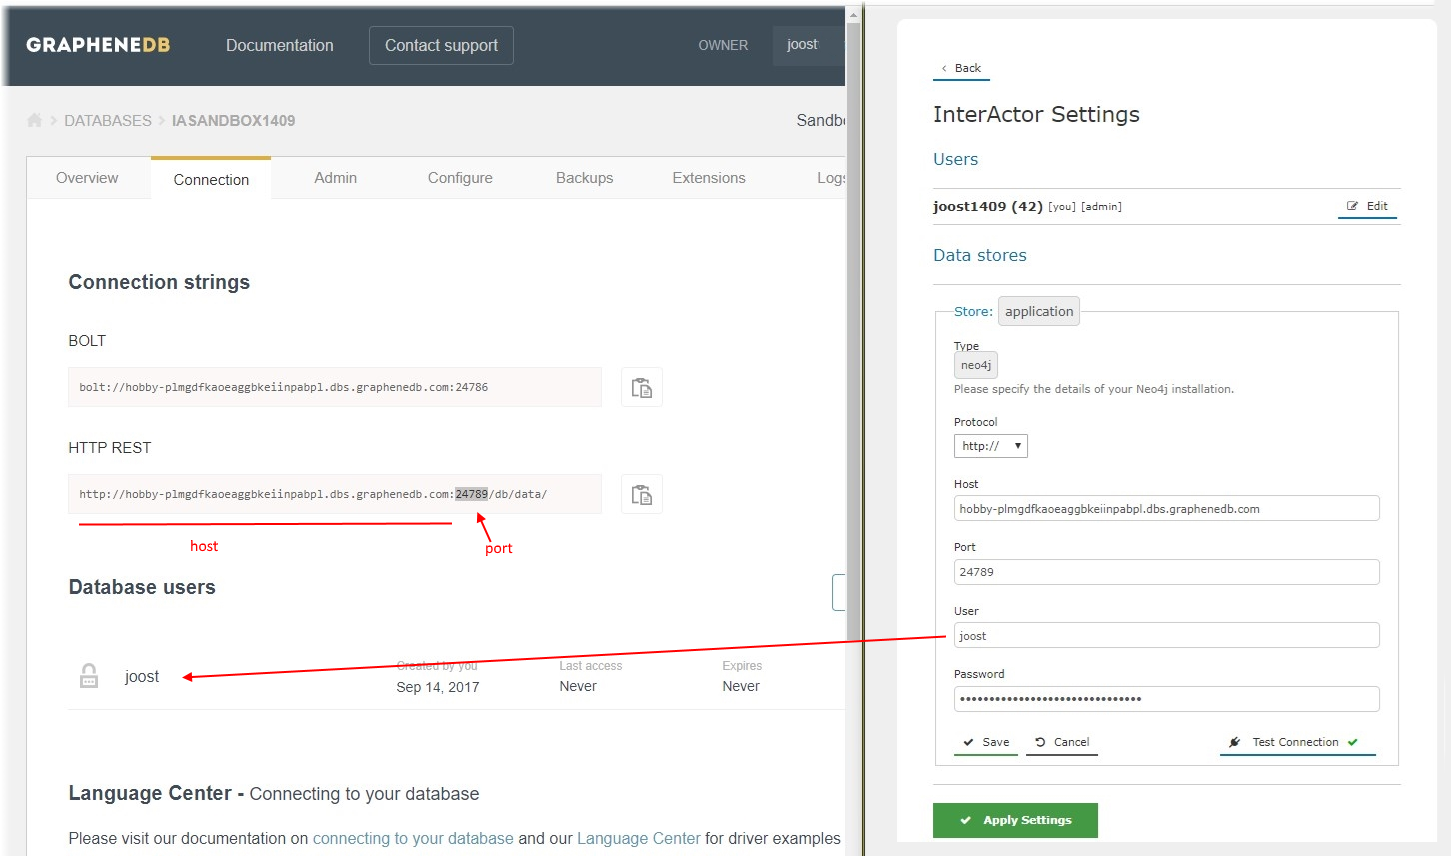
Select "http://" for 'Protocol', copy the first part of the HTTP REST string (up to and including ".com", excluding the remainder) to 'Host', set 'Port' to the port number as in the HTTP REST string. 'User' is set to the user as listed under the GrapheneDB Database users. Note that the matching password was provided by GrapheneDB when the user was created and is no longer visible in this dialog. Now click 'Test Connection' and if succesful, 'Save' the Data store and finally 'Apply Settings'.